
Ranunculus… I won’t say they are my favorite flowers, because even though I always feel like it as I’m looking at one, I love all other flowers as well. So to avoid saying in each post that I’ve made my favorite flower, let’s just settle for that I love flowers. Looking at them, photographing them, and making them.
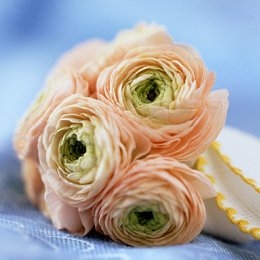
I discovered ranunculus as I saw one on a cake and started googling for more pictures, and I was blown away by all the beautiful colors and arrangements I found! I especially loved a picture of a bouquet of ranunculus, soft peach/pink with a dark green center. So feminine, romantic and striking.. That’s the ranunculus I’ve tried to make today, and I must admit I sort of love the result… 😉
In the past, I’ve used rose petal cutters, but haven’t been quite happy with the result. Now I cut off the top of the petals and I think it turned out so much better! On to the tutorial then!
You’ll need:
- 5-petal cutters or single rose petal cutters of different sizes
- Exacto knife
- Ball tool
- Thin foam pad
- Straw
- Dark green sugarpaste/gumpaste (I mixed pre colored black and green paste)
- Light green sugarpaste/gumpaste (I used a small amount of Wilton leaf green)
- Soft peach/pink sugarpaste (I used small amounts of Wilton’s pink and egg yellow)
- Dark green petal dust (for example forest green by sugarflair)
- Edible glue + brush
1.. Roll a ball of dark green paste. Mine was 1,7 cm in diameter.
2.. Use the straw to give the top half of the ball some structure.

3.. Roll out light green paste as thinly as possible, and either cut out a flower using the smallest 5-petal cutter and cut out the individual petals, or cut out 5 petals with the single petal cutter.

4.. Cut off the top of each petal, but be careful not to cut off too much.

5.. Move the petals to the thin foam pad use the ball tool to thin the edges, giving them a slight ruffle.

6.. Attach the first five petals to the ball, overlapping each other, and paint the tips of the petals with the dark green petal dust.

7.. Make another 5 petals in the same way and attach them to the ball. Paint the tips with petal dust, but don’t apply as much dust as the previous row. Add another two rows, also with 5 petals of the same size, but don’t apply any petal dust. Don’t leave too much space between the petals; you want a tight bud! This is how it should look like now.

8.. The pink/peach petals are made in pretty much the same way, but to make them a little less frilly; thin the center of the petals as well.

9.. Add as many petals as you want, each overlapping the previous. You don’t need to attach them in rows, just add the petals so they overlap the previous, and increase the size of petal when you need to. You want the petals to meet at the bottom. If they don’t, you need to increase the size of petals.

10.. You might want to leave a little room between the last “row” and the other rows since it will make the flower look a little softer.

And that’s it for the ranunculus tutorial! Hope you enjoyed it, and if you try it out, you can share a photo of it on my Facebook page! 🙂
Thanks for looking, and good luck!


Beautiful I love your work.
Thanks Barbara xx
Thanks for another wonderful tutorial. I, too, love flowers. Can’t wait to make this one!
Thank you so much for this lovely flower I just love these flowers, as soon as i get better i will start to make them. you show me how to do it easy. thank you very much. jenny lofts
I love the flowers jenny lofts and keep up the good work
Can’t wait to try this. Lovely again
Thank you! 🙂 Good luck!
Love this flower, can’t wait to try! Thanks for sharing.
Thanks Dee! 🙂 Good luck if you try it out! 🙂
Viltet fint tutorial! Tack.
Tack Elli! 🙂
Pingback: 4 months of blogging! | tarttokig
Wow!!! that is so beautiful, thank you for posting such a step by step tutorial to follow. Thank you, thank you !!!
Thank you Marina! I’m so glad you liked it! 🙂